Free Printables: How to Draw a Flamingo Step by Step
Drawing a flamingo can be a delightful experience, especially with our free printables designed for beginners. This step-by-step guide will help you create a beautiful flamingo drawing with ease.
Why Draw a Flamingo?
Flamingos are known for their unique shape and vibrant colors, making them a fun subject to draw. Here’s why How to draw a flamingo is a great choice for beginners:
- Distinctive Shape: The flamingo’s long legs and elegant neck make for an interesting and recognizable shape.
- Bright Colors: Flamingos are often associated with vivid colors, which makes coloring them fun and engaging.
- Simple Steps: The basic structure of a flamingo is easy to follow, making it perfect for beginners.
What You Need
Before you start, make sure you have:
- Pencil for sketching
- Eraser for corrections
- Colored pencils, markers, or crayons
- Our free printable How to Draw a Flamingo worksheets
How to Draw a Flamingo Step by Step:
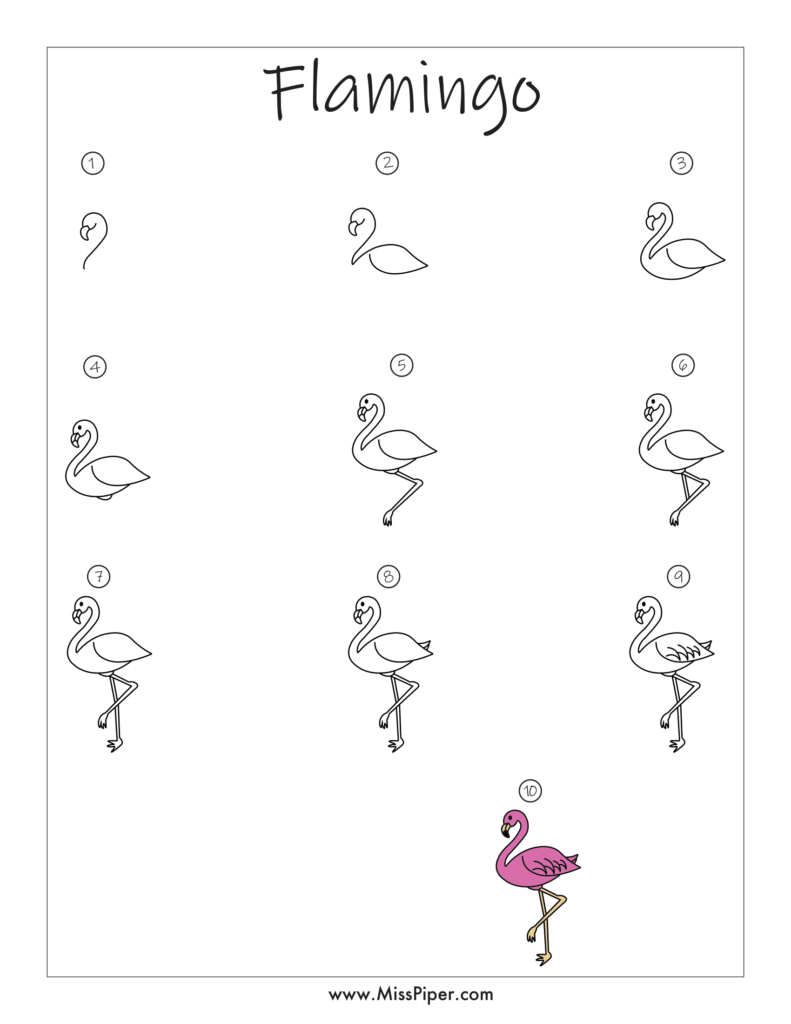
Follow these simple steps of how to draw a flamingo. Our free printables provide clear instructions and visuals to help guide you through each stage.
Step 1: Draw the Basic Shape
Start with the basic outline:
- Body: Draw an oval or pear shape for the body of the flamingo.
- Head: Attach a small circle or oval at the top of the body for the head.
Step 2: Add the Neck and Beak
Create the flamingo’s distinctive neck and beak:
- Neck: Draw a long, curved line extending from the head to the body. The neck should be smooth and elegant.
- Beak: Add a curved line at the front of the head for the beak. Draw a small triangle or a beak shape at the end of this line.
Step 3: Draw the Legs and Feet
Add the flamingo’s long legs:
- Legs: Draw two long, thin lines extending down from the bottom of the body for the legs. Make them slightly curved.
- Feet: At the end of each leg, draw three or four short lines to represent the toes.
Step 4: Add Wings and Tail
Include the wings and tail:
- Wings: Draw a large, curved shape on one side of the body to represent the wing. You can add some feather details if you like.
- Tail: Draw a small, pointed shape at the back of the body for the tail.
Step 5: Add Details and Texture
Enhance your drawing with details:
- Feathers: Add curved lines or feather shapes to the wings and body for texture.
- Eyes: Draw a small circle for the eye and add a dot inside for the pupil.
- Beak Details: Add a line or two on the beak for more detail.
Step 6: Refine Your Drawing
Make your drawing look neat and polished:
- Erase Extra Lines: Use your eraser to clean up any unnecessary lines or mistakes.
- Smooth Lines: Go over your drawing with your pencil to make all lines clear and well-defined.
Step 7: Color Your Flamingo
Add vibrant colors to complete your flamingo:
- Body: Use shades of pink or coral for the body and wings.
- Beak: Color the beak in a bright yellow or orange.
- Legs and Feet: Use pink or a lighter shade for the legs and feet.
Free Printable How to Draw a Flamingo Worksheets
To make drawing a flamingo easier, we offer free printables with step-by-step instructions. These worksheets include detailed visuals to guide you through each stage of the drawing process. Simply download and print the worksheets to get started on your flamingo drawing!
Why Drawing a Flamingo is Great for Beginners
Drawing a flamingo is particularly enjoyable for beginners because:
- Simple Shapes: The flamingo’s body is made up of basic shapes, making it easy to draw.
- Elegant Design: The graceful neck and long legs give the flamingo a unique and beautiful appearance.
- Creative Coloring: The bright colors associated with flamingos allow for a fun and creative coloring experience.
Fun Ideas for Drawing Flamingos
Once you’ve mastered how to draw a flamingo, try these creative ideas:
- Different Poses: Draw flamingos in various poses, such as standing on one leg or walking.
- Add a Background: Include elements like water or tropical plants to enhance your drawing.
- Personalize: Add accessories or different expressions to give your flamingo character and personality.
Conclusion
Learning how to draw a flamingo step by step is a fun and engaging activity for beginners. With our free printables, you can easily follow along and create a charming flamingo drawing.
Download our free printable worksheets today and start drawing your perfect flamingo. Whether it’s for a school project or just for fun, drawing a flamingo is a great way to practice your artistic skills and enjoy a creative activity.
We hope our drawing activities bring joy and creativity to kids everywhere. Happy drawing!
