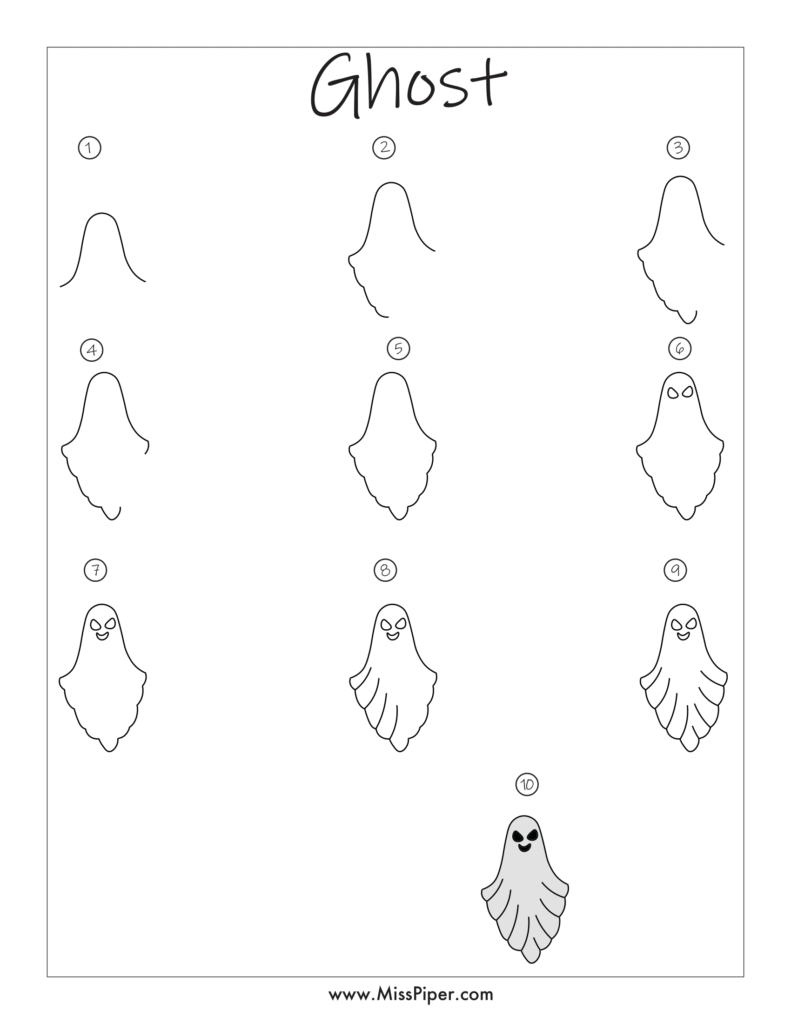
Free Printables: How to Draw a Ghost Step by Step
Learning how to draw a ghost is fun and simple. Ghosts are popular characters, especially around Halloween, and kids love drawing them. With just a few easy steps, children can create their own spooky or friendly ghost. In this guide, we’ll show you how to draw a ghost step by step. Plus, we’re offering free printable worksheets to make it even easier.
Why Learn How to Draw a Ghost?
Drawing a ghost is a great way for kids to get creative. It can be a spooky ghost for Halloween or a cute ghost with a smile. This activity encourages imagination and helps develop drawing skills. It’s also a perfect craft for kids to enjoy during the Halloween season or any time they want to draw something fun and simple.
What Do You Need?
Before we get started, make sure you have the following supplies:
- A pencil for drawing
- An eraser to fix any mistakes
- Crayons, markers, or colored pencils to color your ghost
- Our free printable How to Draw a Ghost worksheet
How to Draw a Ghost Step by Step
Let’s go through the steps to draw a ghost. You’ll find it’s easy, and you can make your ghost as spooky or cute as you like!
Step 1: Draw the Ghost’s Head
Start by drawing the top of the ghost.
- Head: Draw a large curved shape at the top of the page, like an upside-down U. This will be the top part of the ghost’s body.
Step 2: Add the Ghost’s Body
Now, draw the body to complete the ghost’s shape.
- Body: From the ends of the curve, draw wavy lines going downward. Let the lines curve back and forth like waves to give the ghost a floating look. Connect the lines at the bottom to form the ghost’s body.
Step 3: Draw the Ghost’s Eyes
Let’s add some eyes to give your ghost character.
- Eyes: Draw two large circles or ovals near the top of the ghost’s body. You can make the eyes big and round for a cute ghost, or small and narrow for a spookier look.
Step 4: Add the Mouth
Now, draw the ghost’s mouth.
- Mouth: Below the eyes, draw a small oval or a wavy line for the mouth. If you want a happy ghost, draw a smile. For a scarier ghost, draw an open, oval-shaped mouth like it’s saying “Boo!”
Step 5: Draw the Ghost’s Arms
Now, let’s give the ghost some arms.
- Arms: On each side of the ghost’s body, draw two more curved lines, like the shape of a wave. These will be the ghost’s arms, waving up or down. Make them short and floaty.
Step 6: Add Final Details
Your ghost is almost finished! Now let’s clean up the drawing and add any final touches.
- Erase: If there are any extra lines or small mistakes, use your eraser to clean them up.
- Details: You can add more spooky features if you like, such as small shadows or light lines to give the ghost more shape.
Step 7: Color Your Ghost
If you want, you can color your ghost to make it stand out.
- White Ghost: Most ghosts are white, but you can add shading or light gray around the edges to make it look more 3D.
- Eyes and Mouth: Color the eyes black or dark gray, and add a little color to the mouth if you like.
Free Printable How to Draw a Ghost Worksheets
We’ve created free printable worksheets to show you how to draw a ghost step by step. These worksheets are perfect for kids to follow along and create their own spooky ghost. Just print them out and start drawing!
Why Drawing a Ghost is Fun for Kids
Drawing a ghost has many benefits for kids. It’s not just a fun activity but also helps with learning and creativity.
- Easy to Draw: Ghosts are simple shapes, making them great for beginner artists.
- Encourages Creativity: Kids can create their own style of ghost, from spooky to silly, adding unique details like eyes and facial expressions.
- Improves Drawing Skills: Step-by-step drawing helps kids improve their fine motor skills and hand-eye coordination.
Fun Ideas for Drawing Ghosts
Once kids learn how to draw a ghost, they can get even more creative. Here are some ideas to make their ghost drawings unique:
- Halloween Ghost: Add a pumpkin, bat, or spider next to the ghost to create a Halloween scene.
- Friendly Ghost: Draw a ghost with a big smile and waving arms to make it look happy and friendly.
- Spooky Ghost: Draw a dark, stormy background with trees or a haunted house behind the ghost for a scarier effect.
Conclusion
Learning how to draw a ghost step by step is a fun and easy activity for kids. With our free printable worksheets, they can practice drawing their own ghost and create a spooky character for Halloween or any time of year. Encourage your child to experiment with different ghost designs, and let their imagination take over.
Don’t forget to download our free printables and start drawing your ghost today! Whether it’s cute, spooky, or funny, your child will love creating their own ghost character.
We hope our drawing activities bring joy and creativity to kids everywhere. Happy drawing!
