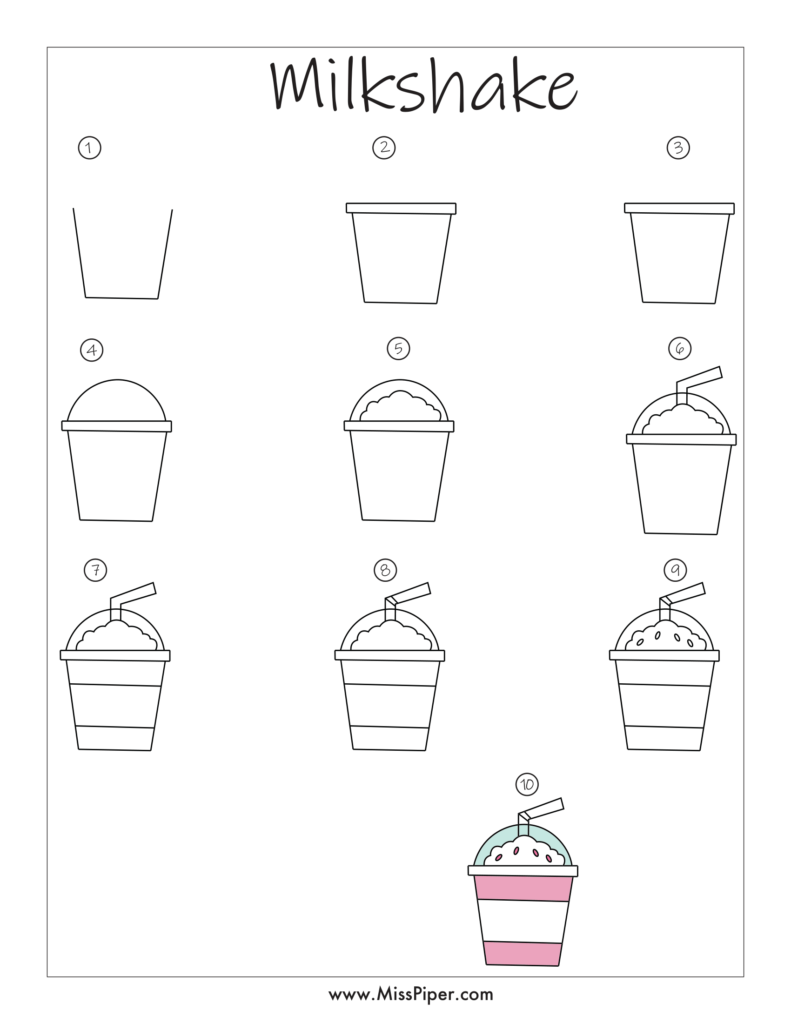
Free Printables: How to Draw a Milkshake Step by Step
Drawing a milkshake can be a fun and delicious activity for kids! With its fun shapes, bright colors, and tasty toppings, a milkshake is a great subject to practice drawing skills. In this guide, we’ll walk you through how to draw a milkshakestep by step, and you can download our free printables to help you along the way.
Why Learn How to Draw a Milkshake?
Learning how to draw a milkshake helps kids:
- Boost Creativity: Drawing a milkshake allows kids to use their imagination for flavors, colors, and toppings.
- Practice Drawing Skills: It helps with drawing basic shapes and understanding proportions.
- Have Fun: Creating a milkshake drawing is a fun way to practice art and make something visually appealing.
What You Need
Before you start drawing, gather these materials:
- A pencil for sketching
- An eraser for corrections
- Colored pencils, markers, or crayons
- Our free printable How to Draw a Milkshake worksheets
How to Draw a Milkshake Step by Step
Let’s get started with drawing a milkshake! Follow these simple steps and use our free printables to guide you.
Step 1: Draw the Milkshake Glass
Begin by drawing the glass that holds the milkshake.
- Glass Shape: Draw a tall, curved rectangle with slightly flared sides. This will be the main part of the milkshake glass. Add a small, curved line at the top to represent the rim of the glass.
Step 2: Add the Milkshake Inside the Glass
Next, we’ll draw the milkshake itself inside the glass.
- Milkshake: Inside the glass, draw a wavy line that follows the curve of the glass. This line represents the top of the milkshake. Make it slightly uneven to show that the milkshake is frothy and full.
Step 3: Draw the Straw
A milkshake isn’t complete without a straw!
- Straw: Draw a straight line going down from the top of the glass. Add a slightly curved line to show the straw bending. At the top of the straw, draw a small oval for the opening.
Step 4: Add Toppings
Toppings make your milkshake look even more delicious.
- Whipped Cream: On top of the milkshake, draw a wavy, cloud-like shape to represent whipped cream. Add small peaks and curves for texture.
- Cherry (Optional): Draw a small circle on top of the whipped cream for a cherry. Add a short, curved line for the cherry stem.
Step 5: Add Details and Texture
Make your milkshake drawing look more realistic with some details.
- Glass Details: Add a few curved lines on the glass to represent reflections. This makes the glass look shiny.
- Milkshake Texture: Draw some small, curved lines inside the milkshake to show its texture. You can also add a few bubbles or lines to suggest the frothy top.
Step 6: Refine Your Drawing
Clean up your drawing to make it look polished.
- Erase Extra Lines: Use your eraser to remove any unnecessary lines or mistakes.
- Smooth Lines: Go over your drawing with your pencil to make sure all the lines are clean and clear.
Step 7: Color Your Milkshake
Now it’s time to add color and make your milkshake look tasty!
- Milkshake Color: Use colors like pink, chocolate brown, or vanilla white for the milkshake. You can choose any flavor you like.
- Whipped Cream: Color the whipped cream in white or a light color.
- Straw and Cherry: Color the straw with bright colors like red or blue. Color the cherry red or your favorite color.
Free Printable How to Draw a Milkshake Worksheets
To make drawing easier, we’ve created free printables of how to draw a milkshake step by step. These worksheets guide you through each stage of the drawing process. Print them out and follow the steps to create your own delicious-looking milkshake!
Why Drawing a Milkshake is Fun for Kids
Drawing a milkshake offers many benefits:
- Encourages Creativity: Kids can experiment with different flavors, colors, and toppings.
- Improves Fine Motor Skills: Drawing detailed elements helps with fine motor skill development.
- Provides Enjoyment: The process of creating something fun and colorful makes drawing enjoyable.
Fun Ideas for Drawing Milkshakes
Once you’ve mastered how to draw a milkshake, try these fun ideas:
- Design Your Own Milkshake: Create milkshakes with different flavors, colors, and toppings.
- Draw a Milkshake Shop: Illustrate a whole milkshake bar or shop with various milkshakes and accessories.
- Create a Milkshake Menu: Design a menu with different milkshake flavors and toppings.
Conclusion
Learning how to draw a milkshake step by step is a fun way for kids to practice their drawing skills while using their imagination. With our free printables, drawing a milkshake becomes an easy and enjoyable activity.
Download our free printable worksheets today and start drawing your perfect milkshake. Whether it’s for a school project or just for fun, drawing milkshakes is a great way to explore creativity and enhance artistic abilities.
We hope our drawing activities bring joy and creativity to kids everywhere. Happy drawing!
