Free Printables: How to Draw a Porcupine Step by Step
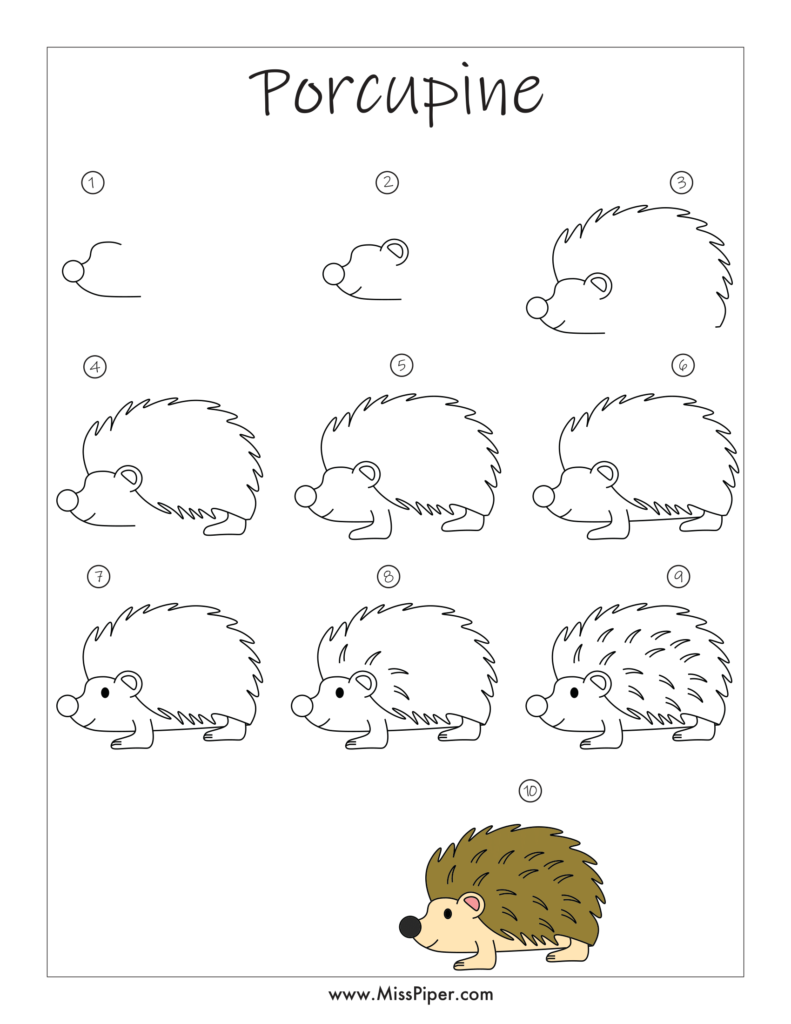
Drawing a porcupine can be a delightful and engaging way to practice your art skills. Our free printables will guide you through how to draw a porcupine step by step, making it easy for beginners to create their own adorable porcupine illustrations.
Why Learn How to Draw a Porcupine?
Drawing a porcupine offers several benefits:
- Artistic Practice: It helps enhance your drawing skills with a fun and interesting subject.
- Creative Fun: Porcupines are unique animals with distinctive features, making the drawing process enjoyable.
- Educational Value: Learn more about porcupines and their unique quills while practicing your art.
What You Need
Before you start, gather these materials:
- A pencil for sketching
- An eraser for corrections
- Colored pencils, markers, or crayons
- Our free printable How to Draw a Porcupine worksheets
How to Draw a Porcupine Step by Step
Follow these simple steps to draw a porcupine. Our free printables provide clear instructions and visuals to guide you through the process.
Step 1: Draw the Basic Shape
Start with the basic outline of your porcupine:
- Body Shape: Draw a large, rounded oval for the body. This will be the main part of the porcupine.
- Head: Attach a smaller, rounded shape at one end of the body for the head.
Step 2: Add the Face and Ears
Create the porcupine’s facial features:
- Eyes: Draw two small, round eyes near the front of the head. Add tiny circles inside for pupils.
- Nose: Sketch a small, rounded shape or oval in the middle of the face for the nose.
- Mouth: Add a small curved line beneath the nose for the mouth.
- Ears: Draw two small, rounded ears on top of the head.
Step 3: Draw the Quills
Add the distinctive quills that make the porcupine unique:
- Quills: Draw long, straight lines extending from the back of the porcupine’s body. Arrange them in a slightly curved pattern to cover the back and sides of the porcupine.
- Layering: Draw additional quills behind the first set to create a layered effect.
Step 4: Draw the Legs and Tail
Add the legs and tail to complete your porcupine:
- Front Legs: Draw two short, rounded shapes at the front of the body for the front legs. Add small ovals at the ends for the paws.
- Back Legs: Draw two slightly larger, rounded shapes at the back of the body for the back legs. Add small ovals at the ends for the paws.
- Tail: Draw a short, curved shape extending from the back of the body for the tail.
Step 5: Add Details and Texture
Give your porcupine some extra character:
- Fur Texture: Add some short, curved lines around the body and legs to represent fur.
- Quill Texture: Add small lines on the quills to give them a spiky texture.
Step 6: Refine Your Drawing
Make your drawing look polished:
- Erase Extra Lines: Use your eraser to remove any unnecessary lines or mistakes.
- Smooth Lines: Go over your drawing with your pencil to make all lines clear and neat.
Step 7: Color Your Porcupine
Add color to bring your porcupine to life:
- Body: Use shades of brown or gray for the body.
- Quills: Color the quills a slightly darker shade or use different shades for variety.
- Eyes and Nose: Use black for the eyes and nose.
Free Printable How to Draw a Porcupine Worksheets
To make drawing a porcupine easier, we’ve created free printables of how to draw a porcupine step by step. These worksheets include detailed instructions and illustrations to help you draw a cute porcupine. Print them out and follow the steps to create your own porcupine drawing!
Why Drawing a Porcupine is Fun for Beginners
Drawing a porcupine is particularly enjoyable for beginners because:
- Simple Shapes: The porcupine’s body and features are made up of simple shapes, making it easy to draw.
- Unique Details: Adding quills and other details makes the drawing process engaging and fun.
- Creative Learning: Kids and beginners can learn about porcupines while practicing their drawing skills.
Fun Ideas for Drawing Porcupines
Once you’ve mastered how to draw a porcupine, try these creative ideas:
- Different Poses: Draw your porcupine in various poses, such as standing up or curled up.
- Add a Background: Include elements like a forest or burrow to enhance your drawing.
- Personalize: Add accessories or different expressions to give your porcupine a unique personality.
Conclusion
Learning how to draw a porcupine step by step is a fun and accessible activity for beginners. With our free printables, you can easily follow along and create an adorable porcupine illustration.
Download our free printable worksheets today and start drawing your perfect porcupine. Whether for a school project or just for fun, drawing a porcupine is a great way to practice your artistic skills and enjoy a creative activity.
We hope our drawing activities bring joy and creativity to kids everywhere. Happy drawing!
