Free Printables: How to Draw a Rose Step by Step
Learning how to draw a rose can be an enjoyable and rewarding activity. If you want to create beautiful rose drawings, our free printables will guide you step by step. This simple guide is perfect for beginners who want to learn how to draw a rose.
Why Learn How to Draw a Rose?
- Artistic Skill: Drawing roses helps you develop your artistic skills.
- Beautiful Results: Roses are lovely flowers, and learning how to draw a rose can be satisfying.
- Creative Outlet: Drawing roses allows you to express your creativity.
Materials You Need
Before you start drawing, gather these materials:
- Pencil: For sketching the rose.
- Eraser: To correct any mistakes.
- Black Marker or Pen: For outlining your drawing.
- Colored Pencils or Crayons: To add color to your rose.
- Free Printable Worksheets: These will help you follow how to draw a rose step by step.
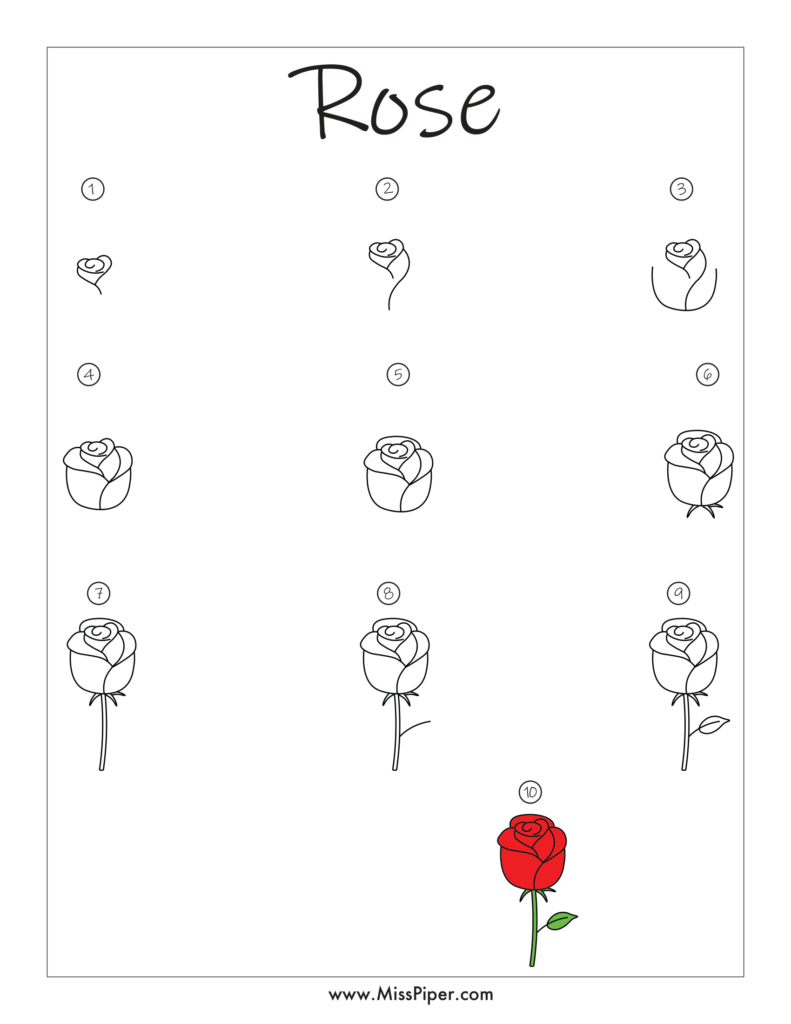
Step-by-Step Guide: How to Draw a Rose
Step 1: Draw the Basic Shape
- Draw the Rose’s Center:
- Start by drawing a small spiral or swirl in the center of your paper. This will be the core of the rose.
- Create the First Petals:
- Around the spiral, draw a few small, curved shapes. These shapes should look like the edges of petals starting to open.
Step 2: Add More Petals
- Draw Additional Petals:
- Continue adding more petal shapes around the center. Each petal should overlap slightly with the ones before it. This makes the rose look fuller.
- Shape the Petals:
- Draw petals with rounded or pointed edges. Petals should vary in size, with larger petals on the outside and smaller ones closer to the center.
- Add Details to the Petals:
- Add small lines inside the petals to show the folds and texture. These lines should curve along the petal shapes.
Step 3: Draw the Leaves and Stem
- Draw the Leaves:
- At the base of the rose, draw a couple of leaf shapes. Leaves are typically long and pointed.
- Add Leaf Details:
- Draw veins in the leaves by adding lines running from the center to the edges.
- Draw the Stem:
- Extend two parallel lines from the base of the rose to create the stem. You can add some curves to make the stem look more natural.
Step 4: Outline Your Drawing
- Outline with a Black Marker:
- Use a black marker or pen to trace over your pencil drawing. This will make the lines clear and bold.
- Erase Pencil Lines:
- After outlining, erase any remaining pencil lines that are not part of the final drawing.
Step 5: Add Color
- Color the Petals:
- Use red, pink, or any color you like for the petals. Color each petal carefully to add depth and texture.
- Color the Leaves:
- Use green for the leaves. You can use different shades of green for variety and realism.
- Color the Stem:
- Use green or brown for the stem to match the natural look.
- Add Final Touches:
- Add any extra details or colors to make your rose drawing look more vibrant and lifelike.
Download Your Free Printable Worksheets
To help you learn how to draw a rose, download our free printables. These worksheets provide a step-by-step guide, making it easy for you to practice and improve your drawing skills.
Why How to Draw a Rose is Great for Beginners
- Easy Instructions: Our guide simplifies how to draw a rose into easy steps.
- Fun and Creative: Drawing roses is a fun way to practice and express creativity.
- Skill Development: Practicing how to draw a rose helps you learn about shapes, colors, and details.
Practice and Improvement
- Draw Different Roses: Practice drawing various roses with different petal shapes and colors.
- Experiment with Styles: Try different styles of roses, such as different colors or shapes.
Conclusion
Learning how to draw a rose is a rewarding and enjoyable activity. Use our free printables to guide you through each step. Regular practice will improve your skills and help you create beautiful rose drawings. Download the worksheets today and start mastering how to draw a rose.
We hope our drawing activities bring joy and creativity to kids everywhere. Happy drawing!