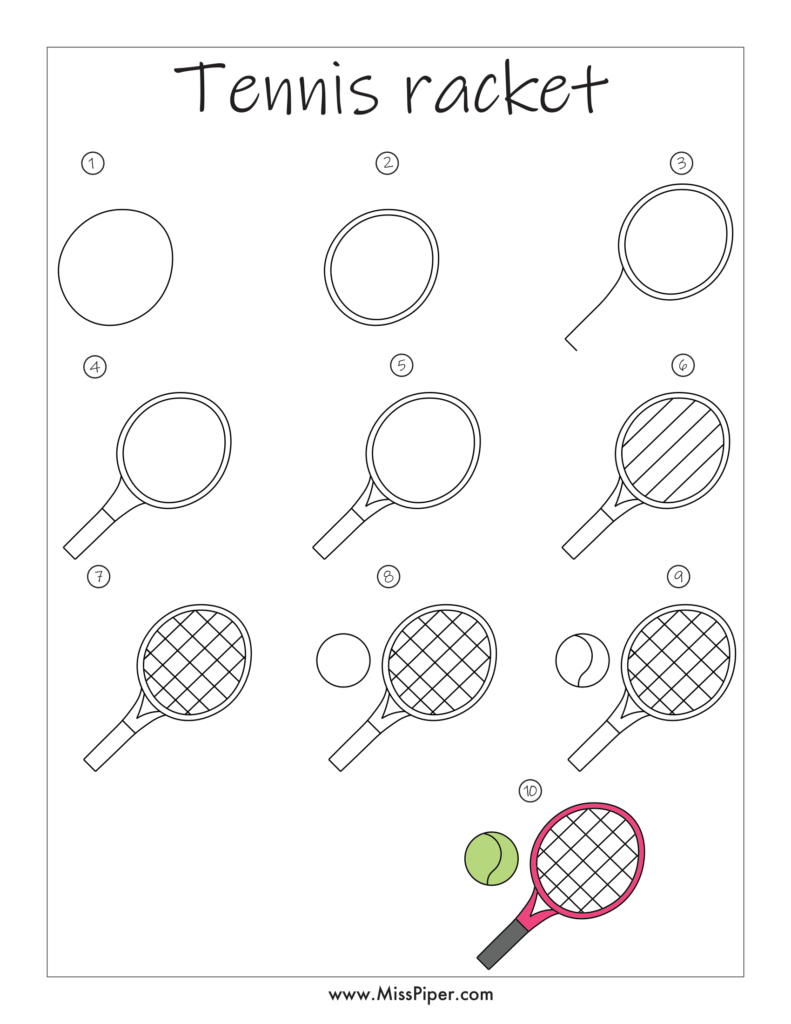
Free Printables: How to Draw a Tennis Racket Step by Step
Drawing a tennis racket can be an exciting and easy activity for beginners. With our free printables, learning how to draw a tennis racket step by step becomes simple and enjoyable. This guide will provide clear instructions to help you create a perfect tennis racket illustration.
Why Learn How to Draw a Tennis Racket
Drawing a tennis racket is a great way to practice basic drawing skills. Here’s why focusing on how to draw a tennis racket is beneficial:
- Simple Shapes: The tennis racket consists of basic shapes, making it perfect for beginners.
- Straight Lines and Curves: Drawing a tennis racket helps you practice drawing straight lines and curves accurately.
- Fun and Practical: It’s a fun activity that results in a recognizable and useful drawing.
Materials You’ll Need
Before you begin, gather these materials:
- Pencil: For sketching the tennis racket.
- Eraser: To clean up any mistakes.
- Colored Pencils, Markers, or Crayons: For adding color to your racket.
- Free Printable Worksheets: Our step-by-step guide on how to draw a tennis racket.
Step-by-Step Guide: How to Draw a Tennis Racket
Using our free printables, follow these easy steps to draw a tennis racket. Each step is designed to be clear and simple, making the process enjoyable for beginners.
Step 1: Draw the Racket’s Frame
Start by drawing the outer shape of the racket:
- Outline the Frame: Draw an elongated oval or egg shape for the head of the racket. This shape should be slightly flattened at the top and rounded at the bottom.
- Handle: Extend two parallel lines downward from the bottom of the oval to form the handle. Connect these lines at the bottom with a slightly curved line.
Step 2: Add the Racket’s Strings
Now it’s time to add the strings inside the racket’s head:
- Vertical Strings: Draw evenly spaced vertical lines within the oval shape. These lines should run from the top of the oval to the bottom.
- Horizontal Strings: Draw horizontal lines crossing the vertical lines. These lines should be evenly spaced and parallel to each other, creating a grid pattern within the oval.
Step 3: Define the Handle
Refine the handle of the racket to give it a more realistic look:
- Handle Details: Add lines along the handle to indicate its grip texture. You can draw small horizontal lines or a pattern to show the handle’s grip.
- End Cap: Draw a small circle or oval at the bottom end of the handle to represent the end cap.
Step 4: Refine Your Drawing
Make sure your drawing looks clean and polished:
- Clean Up: Use an eraser to remove any unnecessary lines or mistakes. Ensure that your drawing is neat and tidy.
- Define Final Lines: Go over the main lines with a pencil or pen to make them clear and defined.
Step 5: Add Color
Bring your tennis racket drawing to life with color:
- Racket Frame: Color the frame of the racket with shades like gray, black, or any color you prefer.
- Strings: Use a lighter color or even leave the strings white to make them stand out against the racket frame.
- Handle: Choose a color that contrasts well with the racket frame. Brown or black is commonly used for the handle.
Download and Use Our Free Printables
To help you master how to draw a tennis racket, we offer free printable worksheets with step-by-step instructions and illustrations. Download and print these worksheets to guide you through the drawing process.
Why How to Draw a Tennis Racket is Great for Beginners
Understanding how to draw a tennis racket is perfect for beginners for several reasons:
- Basic Shapes: The tennis racket consists of simple shapes and lines, making it easy to draw.
- Practice Straight Lines: Drawing the racket helps you practice creating straight lines and even spacing.
- Simple Details: The details, like the strings and handle, are straightforward and easy to add.
Creative Ideas for Your Tennis Racket Drawing
Once you’ve learned how to draw a tennis racket, you can explore these creative ideas:
- Different Racket Designs: Experiment with different racket designs and patterns on the strings or frame.
- Tennis Scene: Create a tennis scene with a player, tennis ball, and court to give context to your racket drawing.
- Add Text: Write the name of a favorite tennis player or a motivational quote related to tennis on the racket.
Conclusion
Learning how to draw a tennis racket is a fun and rewarding experience, especially with our free printables. Our step-by-step worksheets make it easy for beginners to create a detailed and accurate tennis racket drawing.
Download our free printables today and start drawing your tennis racket. With clear instructions and helpful visuals, you’ll be able to complete your drawing with confidence. Enjoy the process and have fun bringing your tennis racket to life!
We hope our drawing activities bring joy and creativity to kids everywhere. Happy drawing!
