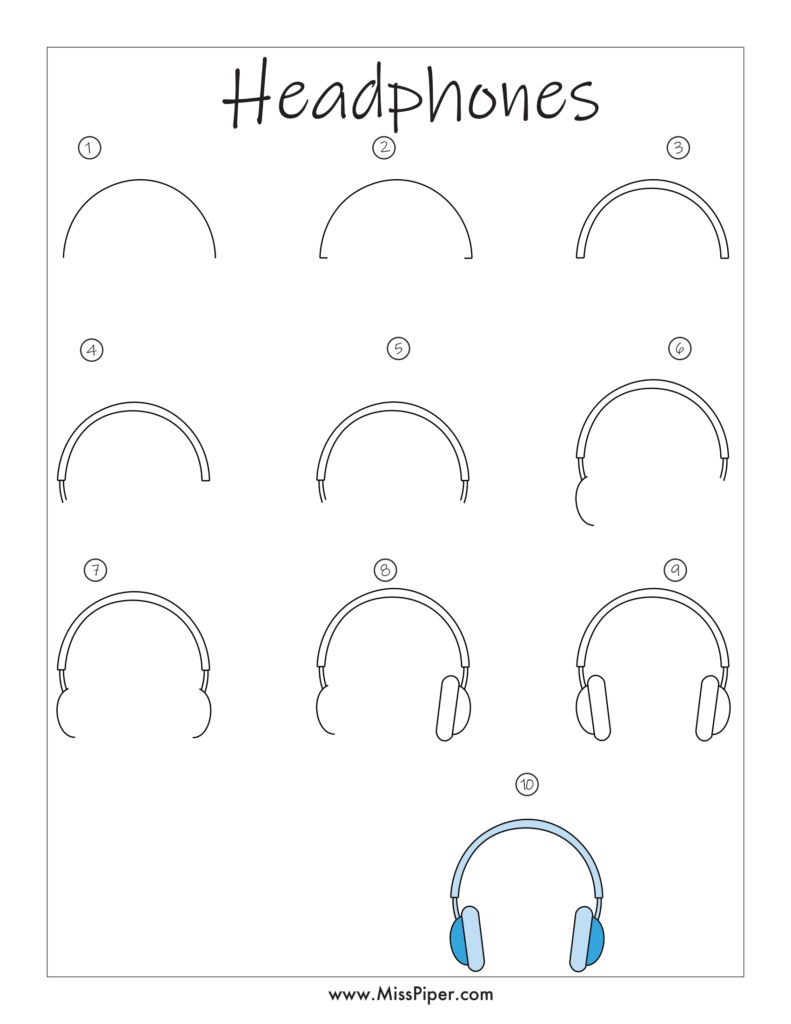
Free Printables: How to Draw Headphones Step by Step
Learning how to draw headphones can be fun and easy for kids and beginners. Headphones are a cool object to draw, especially for kids who love music or gaming. In this guide, we will teach you how to draw headphones step by step, and offer free printable worksheets to help you follow along.
Why Learn How to Draw Headphones?
Drawing headphones helps kids improve their drawing skills and teaches them how to create rounded shapes. This is also a great opportunity to make their drawings fun by customizing the headphones with different colors or designs. Plus, it’s a popular item that kids can relate to, making drawing more exciting.
What You Need
Before starting your headphone drawing, make sure you have:
- A pencil for sketching
- An eraser to fix any mistakes
- Crayons, colored pencils, or markers to color in your headphones
- Our free printable How to Draw Headphones worksheets
How to Draw Headphones Step by Step
Now, let’s get into the steps for drawing headphones. Follow along, and soon you’ll have your own cool pair of headphones on paper.
Step 1: Draw the Headband
Start by drawing the headband that sits over the top of the head.
- Headband: Draw a wide curved shape like an upside-down “U.” This is the part that goes over the head.
Step 2: Draw the Ear Cups
Next, we’ll add the ear cups. These are the parts that cover your ears.
- Ear Cups: Draw a small circle or oval on each end of the headband. Make sure both ear cups are the same size. These should be at the bottom of each side of the “U” shape.
Step 3: Add Depth to the Ear Cups
Now, give the ear cups some thickness to make them look more realistic.
- Thick Ear Cups: Draw a slightly larger oval or circle around each ear cup. This outer line gives the ear cups a padded look. You can erase any lines that overlap inside the ear cups to make it look clean.
Step 4: Add the Ear Pads
Inside each ear cup, draw another smaller circle or oval. These will be the ear pads.
- Ear Pads: The smaller shapes should sit neatly inside the ear cups. These are the soft parts that touch the ears when you wear headphones.
Step 5: Draw the Wire (Optional)
If your headphones have a wire, now’s the time to add it.
- Wire: Draw a long line coming from one of the ear cups (usually the left side). The wire can go downwards, and you can make it as long or short as you like. Add little curves to the line to make it look natural.
Step 6: Add Final Details
Now, let’s finish up your headphones with some final touches.
- Erase Extra Lines: Clean up any extra lines or mistakes with your eraser.
- Details: You can add details like a brand logo on the ear cups or extra lines on the headband for more design.
Step 7: Color Your Headphones
Now it’s time to color your headphones. You can get creative with the colors!
- Customize: You can color the headband and ear cups in different colors. Make them black for a classic look, or use bright colors like red, blue, or pink for a fun design.
Free Printable How to Draw Headphones Worksheets
We’ve created free printables to help guide you through how to draw headphones. Our worksheets show each step clearly, so you can follow along at your own pace. Just print them out, grab your pencil, and start drawing!
Why Drawing Headphones is Fun for Kids
Drawing headphones offers several benefits for kids. It’s not just about creating a cool image; it also helps in developing important skills.
- Boosts Creativity: Kids can design their own headphones, adding patterns, colors, and fun details like stars or logos.
- Improves Fine Motor Skills: Drawing the curved shapes of the headband and ear cups helps kids develop their hand-eye coordination.
- Encourages Imagination: Once they know how to draw headphones, kids can imagine different settings, like adding their character using the headphones for listening to music or gaming.
Fun Ideas for Drawing Headphones
Once kids learn how to draw headphones, they can take their drawings to the next level by adding extra features. Here are some fun ideas:
- Personalized Headphones: Add your name or a fun sticker design to the ear cups to make them your own.
- Gaming Headphones: Add a microphone on one side of the headphones for a gaming headset look.
- Music Scene: Draw a music player or smartphone next to the headphones with musical notes coming out of them.
Conclusion
Learning how to draw headphones step by step is a simple yet enjoyable activity. With just a few easy shapes, kids can create their own unique headphones design. Our free printables make it even easier to follow the steps and practice drawing. Whether kids want to draw for fun or improve their artistic skills, headphones are a great object to start with.
Download our free printables and get started on your headphone drawing today!
We hope our drawing activities bring joy and creativity to kids everywhere. Happy drawing!
